Connecting to UVic wifi with Linux for the first time can be a pain in the ass. I literally spent hours trying to figure out how to connect my Linux based laptop to UVic wifi. I thought that it would be helpful to share how I did it that will probably save you some struggles. Here is the set up that I did that worked. Please let me know in the comment if this does not work for you. I will try to reply and help you out.
First step, connect to the Uvic network and not the UvicStart. A Wi-Fi Network Authentication Required dialog should come up. Change the Authentication method from Tunneled TLS to Protected EAP (PEAP).
Next, for Ubuntu 16.04 LTS users, simply browse to your CA certificate in the path /etc/ssl/certs to select thawte_Primary_Root_CA.pem. For those who are using Debian 10, you do not need to select a CA certificate; just check No CA certificate is required.
Later, put in your UVic Netlink ID as your Username (Make sure to put @uvic.ca as well) and UVic Netlink ID password as your Password. All together, it should look something similar to this.
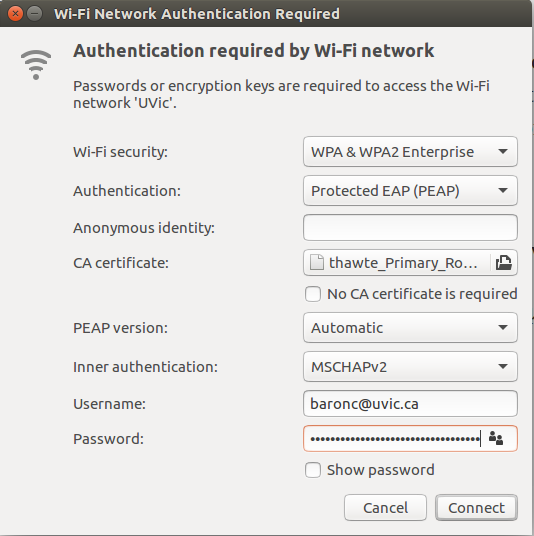
Simply click the connect button and it should work!
Tada. You should now be able to connect to UVic wifi using your Linux laptop =)
Note: you should only need to configure this once unless you delete or forget the UVic network setting.
Wrapping Up
Hopefully this guide has help you to set up the wifi connection at UVic with Ubuntu. Thank you for reading!
Resources
I’ll try to keep this list current and up to date. If you know of a great resource you’d like to share or notice a broken link, please let us know.
Getting started

Author
PoAn (Baron) Chen
Software Engineer at Microsoft. Graduated from @uvic. Previously worked at @illumina, @ACDSee, @AEHelp and @AcePersonnel1. My words are my own.
Comments