Just like this great article stated that “Combining the Marsyas python bindings with the matplotlib library for plotting in Python creates a great environment for prototyping. In the past few months I have done a lot of Marsyas work using this approach and really enjoy it. It gives a lot of the expressive power and prototyping of MATLAB while retaining the data-flow model and efficient processing of Marsyas. Unfortunately getting everything installed and setup for the first time takes some effort.”
The article was really helpful as it gave a lot of pointer on how one can set up the environment to work with Python binding along with Marsyas. However, the article was written in 2011 which is pretty outdated. Many things have changed since then. For example, the project used to use Subversion to host their code. Now, they have moved to GitHub with git. File structure has changed, some of the paths would no longer work. In order to make it work, I had to do some research and hacks to make the build pass. I thought that I will be sharing the steps on how I did it that will probably help some of you guys out in the future. As making this build pass can be tricky and frustrated. Please follow the steps carefully and do let me know in the comment if you have any questions. It will be my pleasure to help you guys out.
The first step is to get git and cmake installed. I did all the package installation directly using apt because why not right?
Please download and install these packages using these commands if you have not done so already.
  sudo apt install git
  sudo apt install cmake
  sudo apt install cmake-curses-gui
  sudo apt install libasound2-dev
source code hosted on GitHub
Note: We encourage users to use apt instead of apt-get according to this article.
Next, we are ready to get the latest released version of Marsyas from GitHub, configure and compile.
Note: the hack that I was talking about was that the latest released version 0.5.0 from github.com/marsyas/marsyas did not really work for me when I did it. I had to fork the repository and make some adjustments in order for it to work.
  wget https://github.com/poanchen/marsyas/archive/version-0.5.1.tar.gz
  tar xvzf version-0.5.1.tar.gz
  cd marsyas-version-0.5.1/
  mkdir build
  cd build
  ccmake ../ (First, select c to configure. And then, select g to generate and exit.)
  make -j 3 (or higher if you have more cores) (This will take quite a bit of time to build it)
source code hosted on GitHub
Note: the ccmake ../ used to be ccmake ../src, however, because “the top-level CMake file has now been moved to the root of the repository tree, so you should point cmake to the top-level dir instead of the src directory.” according to this answer from Jakob.
When the compilation is finished, you can check out the Marsyas command-line tools.
cd bin ./HelloWorld (Ctrl+C to force shut down or similar) cd .. source code hosted on GitHub
If everything worked, you will hear a sine wave playing in your speakers.
Now, we are ready to get the Python/SWIG bindings going. Please download and install these packages using these commands if you have not done so already.
  sudo apt install swig
  sudo apt install python-dev (the python headers)
  sudo apt install python-matplotlib
  sudo apt install ipython
  sudo apt install libfreetype6-dev
source code hosted on GitHub
Next, you need to reconfigure/compile Marsyas to use Python/SWIG to create the python bindings.
  ccmake ../ (First, press enter with up and down arrow to enable the WITH_SWIG and WITH_PNG option to be ON. And then, select g to generate and exit.)
  make -j 3 (or higher if you have more cores) (This will take quite a bit of time to build it)
  sudo make install (Install the Marsyas python bindings so that Python can find them globally)
  sudo ldconfig /usr/local/lib (Add /usr/local/lib to the path searched for libraries)
source code hosted on GitHub
If everything worked, you can now combine Marsyas and Matplotlib. To check, try:
  cd src/marsyas_python
  python windowing.py
source code hosted on GitHub
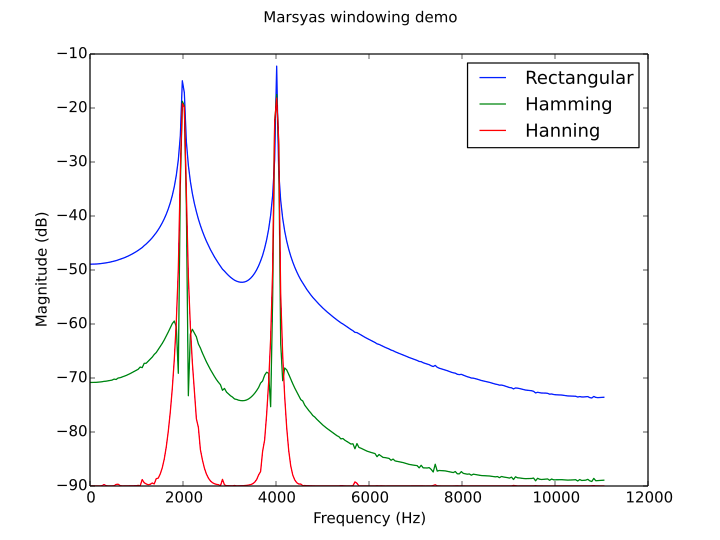
After running these commands, you should be able to see a nice generated figure looking like the image below.

If you look at the code in windowing.py, you will see that the computation of the figure data is done through Marsyas. All you need to do is import marsyas at the top of your Python source code. For example, say you need to input a wav file with window of 2048 samples, and you need to plot its power spectrum. Here is how you would do it using the combination of Marsyas and Matplotlib.
sample.mrs
  Series {
    inSamples = 2048
    -> input: SoundFileSource { filename = "sample.wav" }
    -> Windowing { size = 2048 }
    -> Spectrum
    -> PowerSpectrum { spectrumType = "magnitude" }
    -> selection: Selector { disable = 0 }
    -> sink: CsvSink { filename = "output.csv" }
    + done = (input/hasData == false)
  }
source code hosted on GitHub
sample.py
  from pylab import *
  import sys
  from matplotlib import pyplot
  from marsyas import *
  from marsyas_util import *
  y_data = []
  system = marsyas.system_from_script_file("sample.mrs")
  while (system.getControl("SoundFileSource/input/mrs_bool/hasData").to_bool()):
      system.tick()
      y_data.extend(system.getControl("Selector/selection/mrs_realvec/processedData").to_realvec())
      y_data[-1] *=  44100 / 1025 # Sampling Rate / FFT Size
  plot(range(0, len(y_data)), y_data)
  savefig('sample.png')
source code hosted on GitHub
After running the python sample.py commmand, you should be able to see a nice generated figure like this.

Tada. You should now be able to combine the Marsyas python bindings with the matplotlib library for plotting in Python =)
Wrapping Up
Hopefully this guide has help you to set up the environment to work with Python binding along with Marsyas. Thank you for reading!
Resources
I’ll try to keep this list current and up to date. If you know of a great resource you’d like to share or notice a broken link, please let us know.

Comments