Today, I am going to show you guys how to take screenshots at different screen sizes using CasperJS. To make it more fun, we are going to take a screenshots on different device with variety screen sizes. For example, iPhone 4s, iPhone 5, iPhone 6, iPad mini 4, Desktop 720p, and Desktop 1080p. Also, to make this script more useful, the urls that we will be getting the screenshots are from a file that may contains as many urls as you want. I believe this script will be useful for QA to test their site to see what will their site looks like on different device. If you haven’t already, install CasperJS or PhantomJS before we continue on. Now, let’s dive right in.
CasperJS code (screenshots.js) to start with
  var casper = require("casper").create();
  var fs = require('fs');
  var urls = [];
  var inputFile;
  var contents;
  var contentsToJSON;

  if (casper.cli.has(0)) {
    inputFile = casper.cli.get(0).toLowerCase();
  }else{
    casper.echo("No file passed, aborting...").exit();
  }
The code will simply tried to see if user provide an input file, otherwise, it will simply throws error and abort. Next things is, we need to get all the urls from the input file.
CasperJS code (screenshots.js) to get the contents from the input file
contents = fs.read(inputFile);Now, the @variable should have the contents of the file when you execute like this, $ casperjs screenshots.js urls.json. Of course, the urls.json should look something like this.
What the urls.json looks like
  {
    "links": [
      {
        "url": "http://www.example.com"
      },
      {
        "url": "http://www.example.net"
      }
    ]
  }
source code hosted on GitHub
Now, what we are having in the @variable contents is a string. But, it is not so much helpful for us because it is a string and we need to get the urls from it. As a result, we need to use the JSON.parse to convert the string to JSON, so that JavaScript can read it.
CasperJS code (screenshots.js) to use JSON.parse to read the urls from the @variable contents
  contentsToJSON = JSON.parse(contents);

  var listOfLinks = contentsToJSON.links;
  listOfLinks.forEach(function (currentValue, index, arr) {
    urls.push({url: currentValue.url});
  });
Now the @variable urls should have all the urls from the input file. Now, we need to open each url. This is how we are going to do.
CasperJS code (screenshots.js) to open each url
  casper.start().each(urls, function(self, link) {
    self.thenOpen(link.url, function() {
      this.echo("url: " + link.url + " has been opened!");
    });
  });

  casper.run();
A sample of the output of this would look something like this.

Now that each urls has been open, we need to set the height and width for different screen size. So that we can take a screenshot for different size of screen later. Notice that we will be including device like iPhone 4s, iPhone 5, iPhone 6, iPad mini 4, Desktop 720p, and Desktop 1080p. And, the code will look something like this.
CasperJS code (screenshots.js) for different device at different screen size
  var viewports = [
    {
      'name': 'Apple-iPhone-4s-portrait',
      'viewport': {width: 320, height: 480}
    },
    {
      'name': 'Apple-iPhone-4s-landscape',
      'viewport': {width: 480, height: 320}
    },
    {
      'name': 'Apple-iPhone-5-portrait',
      'viewport': {width: 320, height: 568}
    },
    {
      'name': 'Apple-iPhone-5-landscape',
      'viewport': {width: 568, height: 320}
    },
    {
      'name': 'Apple-iPhone-6-portrait',
      'viewport': {width: 540, height: 960}
    },
    {
      'name': 'Apple-iPhone-6-landscape',
      'viewport': {width: 960, height: 540}
    },
    {
      'name': 'Apple-iPad-mini-4-portrait',
      'viewport': {width: 768, height: 1024}
    },
    {
      'name': 'Apple-iPad-mini-4-landscape',
      'viewport': {width: 1024, height: 768}
    },
    {
      'name': 'Desktop-720p-HD',
      'viewport': {width: 1280, height: 720}
    },
    {
      'name': 'Desktop-1080p-HD',
      'viewport': {width: 1920, height: 1080}
    }
  ];
This will be the list of width and height for different device at different screen size. And, now we have this. We can try to take a screenshot on different device for each url that we opened.
CasperJS code (screenshots.js) for taking screenshot for different device for each url that we opened
  casper.start().each(urls, function(self, link) {
    self.thenOpen(link.url, function() {
      var folderPath = 'screenshots/' + link.url.split('//')[1].split('/')[0] + '/';
      console.log("Taking screenshot for the url " + link.url + "...")
      viewports.forEach(function (currentValue) {
        console.log('Screenshot for ' + currentValue.name + ' (' + currentValue.viewport.width + 'x' + currentValue.viewport.height + ')', 'info');
        self.viewport(currentValue.viewport.width, currentValue.viewport.height);
        self.capture(folderPath + currentValue.name + '-' + currentValue.viewport.width + 'x' + currentValue.viewport.height + '.png', {
          top: 0,
          left: 0,
          width: currentValue.viewport.width,
          height: currentValue.viewport.height
        });
      });
    });
  });
A sample of the output of this would look something like this.
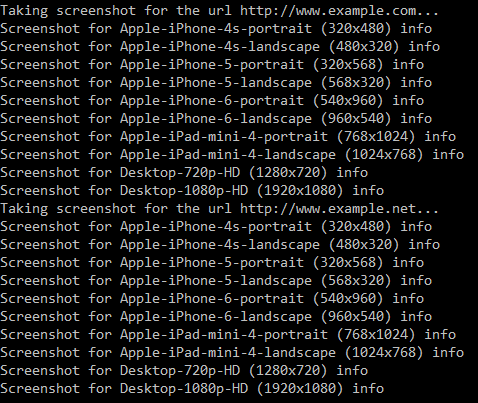
Now, when you run the code like this, $ casperjs screenshots.js urls.json, you should see screenshots has been taken for each url that we opened on different device. To be more clear, the full code for screenshots.js is as follows.
CasperJS code (screenshots.js) for taking screenshot for different device for each url that we opened
  var casper = require("casper").create();
  var fs = require('fs');
  var urls = [];
  var inputFile;
  var contents;
  var contentsToJSON;
  var viewports = [
    {
      'name': 'Apple-iPhone-4s-portrait',
      'viewport': {width: 320, height: 480}
    },
    {
      'name': 'Apple-iPhone-4s-landscape',
      'viewport': {width: 480, height: 320}
    },
    {
      'name': 'Apple-iPhone-5-portrait',
      'viewport': {width: 320, height: 568}
    },
    {
      'name': 'Apple-iPhone-5-landscape',
      'viewport': {width: 568, height: 320}
    },
    {
      'name': 'Apple-iPhone-6-portrait',
      'viewport': {width: 540, height: 960}
    },
    {
      'name': 'Apple-iPhone-6-landscape',
      'viewport': {width: 960, height: 540}
    },
    {
      'name': 'Apple-iPad-mini-4-portrait',
      'viewport': {width: 768, height: 1024}
    },
    {
      'name': 'Apple-iPad-mini-4-landscape',
      'viewport': {width: 1024, height: 768}
    },
    {
      'name': 'Desktop-720p-HD',
      'viewport': {width: 1280, height: 720}
    },
    {
      'name': 'Desktop-1080p-HD',
      'viewport': {width: 1920, height: 1080}
    }
  ];

  if (casper.cli.has(0)) {
    inputFile = casper.cli.get(0).toLowerCase();
  }else{
    casper.echo("No file passed, aborting...").exit();
  }

  contents = fs.read(inputFile);
  contentsToJSON = JSON.parse(contents);

  var listOfLinks = contentsToJSON.links;
  listOfLinks.forEach(function (currentValue, index, arr) {
    urls.push({url: currentValue.url});
  });

  casper.start().each(urls, function(self, link) {
    self.thenOpen(link.url, function() {
      var folderPath = 'screenshots/' + link.url.split('//')[1].split('/')[0] + '/';
      console.log("Taking screenshot for the url " + link.url + "...")
      viewports.forEach(function (currentValue) {
        console.log('Screenshot for ' + currentValue.name + ' (' + currentValue.viewport.width + 'x' + currentValue.viewport.height + ')', 'info');
        self.viewport(currentValue.viewport.width, currentValue.viewport.height);
        self.capture(folderPath + currentValue.name + '-' + currentValue.viewport.width + 'x' + currentValue.viewport.height + '.png', {
          top: 0,
          left: 0,
          width: currentValue.viewport.width,
          height: currentValue.viewport.height
        });
      });
    });
  });

  casper.run();
source code hosted on GitHub
Wrapping Up
Hopefully this guide has given you the confidence to use CasperJS to open urls and take a screenshot. I hope that this tutorial has helped you and thank you for reading!
Resources
I’ll try to keep this list current and up to date. If you know of a great resource you’d like to share or notice a broken link, please let us know.
Getting started
Author
PoAn (Baron) Chen
Software Engineer at Microsoft. Graduated from @uvic. Previously worked at @illumina, @ACDSee, @AEHelp and @AcePersonnel1. My words are my own.
Comments