Today, I am going to show you guys how to pass PHP data like an array to your JavaScript file in WordPress. However, you might be thinking why would I need to pass PHP data to the script. For example, have to ever encounter where you need to use some object or data from PHP in a JavaScript file, but you do not quite want to build a REST API for it as the data isn’t used a lot. Or, have to ever need to embedded php code in your JavaScript in WordPress? If the answer is positive, then this article is for you. This article will teach you on how to properly pass PHP data (an array) to your JavaScript file. However, in order to make this interesting, we are going to have a PHP file that contains some ielts conversation audios from AEHelp. Then, we are going to have another PHP file where learner can see and listen to all the audios. We also gonna have a JavaScript file that will get the audios from the PHP file and generate html for each audio on the fly. Now, we can begin.
PHP code that contains all the audios
  // Audios are from https://www.aehelp.com
  // if you are interested in learning ielts, please go to their site!
  // they have amazing online course for ielts that will
  // help you improve your score!
  $basePath = 'https://d5s5h26eyrr5q.cloudfront.net/';

  $urlsForAllTheAudios = array(
    array(
      'artist' => 'AEHelp',
      'title'  => 'CD1-T-1: Listening Section 1 (Demo)',
      'mp3'    => $basePath . 'ielts-sample-audio/CD1-Track-01.mp3'
    ),
    array(
      'artist' => 'AEHelp',
      'title'  => 'CD1-T-1: Listening Section 3 (Demo)',
      'mp3'    => $basePath . 'ielts-sample-audio/CD1-Track-03.mp3'
    ),
    array(
      'artist' => 'AEHelp',
      'title'  => 'CD1-T-5: Reading Passage 1 (Demo)',
      'mp3'    => $basePath . 'ielts-sample-audio/CD1-Track-05.mp3'
    ),
    array(
      'artist' => 'AEHelp',
      'title'  => 'CD1-T-7: Reading Passage 3 (Demo)',
      'mp3'    => $basePath . 'ielts-sample-audio/CD1-Track-07.mp3'
    ),
    array(
      'artist' => 'AEHelp',
      'title'  => 'CD1-T-8: Speaking Part 1 (Demo)',
      'mp3'    => $basePath . 'ielts-sample-audio/CD1-Track-08.mp3'
    )
  );
source code hosted on GitHub
Now that we have all the audios information in the @variable named urlsForAllTheAudios. Then, we need to pass the array to JavaScript file in WordPress. Before we do that, we are going to create a PHP file. This file would be accessible to user as you should treat this file as the place where to show the users all the audios. First, we need to include the PHP file that we just created above. So that the @variable urlsForAllTheAudios is accessible in this PHP file.
PHP code to start with
  // Include this php file, so that we have all the information for the audio that we will be playing later
  require_once("audioPlaylist.php");
Now that we have the @variable, we need to figure out how to pass that data to the JavaScript file. To do that, we are going to use wp_localize_script. Through the use of this, it can be used to make any PHP data available to your script that you can normally only get from the server side of WordPress.
PHP code to use wp_localize_script
  // Enqueue this js file, so that WordPress knows that we will be using this js file in this page
  wp_enqueue_script('audio-demo-player', get_template_directory_uri() . '/createPlaylist.js');

  // now we need to set the array name to be audio_array, so that later in the js file we can call them with that name
  // we also pass in the array that we have in the require_once
  wp_localize_script('audio-demo-player', 'audio_array', $urlsForAllTheAudios);
This is basically telling the wp_localize_script that we are going to pass this @variable namely urlsForAllTheAudios as audio_array to the JavaScript file named createPlaylist.js. Now, since this is a WordPress site, we need to call the wp_head, so that the js file will be included in this page.
PHP code to call wp_head
  // this trigger the <head></head> section, which will enqueue the js file. Without this, the js file will not be
  // included in this specific page
  wp_head();
Now that we have enqueue the js file in the WordPress head. Now, we simply need to add a Div element in the PHP file, so that the JavaScript know where to put all the audios. For more information about wp_head, please go to here.
HTML code for placeholder of audios
<div id="audio"></div>With this, the JavaScript can now add audio to that Div. Now it is time to create the js file that generate html for each audio on the fly. Then, we are done!
JavaScript code to generate html for each audio
  document.addEventListener("DOMContentLoaded", function(event) {
    for (var i = 0; i < audio_array.length; i++) {
      addAudioToHTML(audio_array[i].artist, audio_array[i].title, audio_array[i].mp3, i);
    }

    function addAudioToHTML (artist, title, source, position) {
      var parentDiv = document.createElement("div");
      var firstP = document.createElement("p");
      var artistForP1 = document.createTextNode("Artist: " + artist);

      firstP.appendChild(artistForP1);
      parentDiv.appendChild(firstP);

      var secondP = document.createElement("p");
      var artistForP2 = document.createTextNode("Title: " + title);

      secondP.appendChild(artistForP2);
      parentDiv.appendChild(secondP);

      var audio = new Audio(source);
      audio.controls = true;
      // add warning message for web browser that does not support audio tag
      audio.innerHTML = "Your browser does not support the audio element.";

      parentDiv.appendChild(audio);

      var audioDiv = document.getElementById('audio');
      document.querySelector('#audio').insertBefore(parentDiv, audioDiv.childNodes[position]);
    }
  });
source code hosted on GitHub
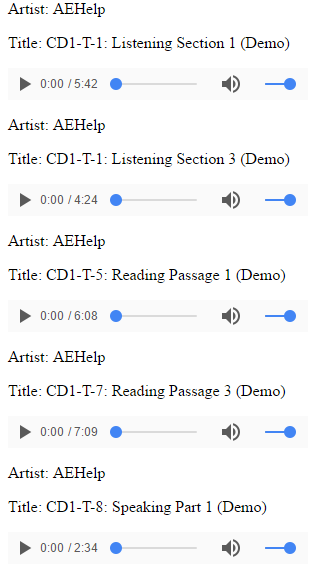
We need to wrap everythings in the DOMContentLoaded because without it, the javascript code will execute before the DOM which will not work (Including your JavaScript in your head section of HTML might increase the page load, hence, do not do that in production). In the code, we have a for loop that grabs each audio information one by one and call the function addAudioToHTML to append the audio to the Div that we created earlier. Notice that to play the audio, we are using the audio tag which is only available in HTML5. Please check here to see if your browser works with HTML5 audio tag. Here is a screenshot of how it would look like. If you would like to see it in live, please check out this link.
Complete code for PHP that show audio playlist to user
<?php
// Include this php file, so that we have all the information for the audio that we will be playing later
require_once("audioPlaylist.php");
// Enqueue this js file, so that WordPress knows that we will be using this js file in this page
wp_enqueue_script('audio-demo-player', get_template_directory_uri() . '/createPlaylist.js');
// now we need to set the array name to be audio_array, so that later in the js file we can call them with that name
// we also pass in the array that we have in the require_once
wp_localize_script('audio-demo-player', 'audio_array', $urlsForAllTheAudios);
// this trigger the <head></head> section, which will enqueue the js file. Without this, the js file will not be
// included in this specific page
wp_head();
?>
<div id="audio"></div>source code hosted on GitHub
Wrapping Up
Hopefully this guide has given you the confidence to pass PHP data to JavaScript file in WordPress. Hopefully, you can . I hope that this tutorial has helped you and you can use this function in your own code and enjoy its benefits! Thank you for reading!
Resources
I’ll try to keep this list current and up to date. If you know of a great resource you’d like to share or notice a broken link, please let us know.
Getting started

Author
PoAn (Baron) Chen
Software Engineer at Microsoft. Graduated from @uvic. Previously worked at @illumina, @ACDSee, @AEHelp and @AcePersonnel1. My words are my own.
Comments